


 |
Your Personal Reference Speed Point
by Phil
Davis
The Plotter now has a new option named “Personal Speed Point” that’s
enabled by default and assigned the value 2.4. You can either use this default
value, or change it to some other number, or disable the feature entirely
by unchecking it.
To understand what this number stands for and why
it’s important, consider how the plotter displays film curves. First, the
horizontal location of the film curve family in the graph space is determined
by two factors: the speed of the film and the amount of exposure your test
provided. If your test is overexposed the curve family will be displaced
to the left in the graph space and some or all of its toe contour may be
lost. If underexposed, the family is displaced to the right and the useful
curve length may be shortened excessively.
The same displacement
will occur if films of different speeds are tested using the same exposure.
In that case the faster film’s family will move to the left and the slower
film’s family will appear farther to the right in the graph space. In other
words, if you want the family to be ideally positioned in the graph space,
you must modify your test exposure to compensate for the film’s speed.
My test setup provides an exposure that is appropriate for testing
ISO 100 films. Assuming that all films have been assigned honest ISO speeds
by their manufacturers, I should be able to reduce the exposure by two stops
to test a 400-speed film, or increase it by one stop to test a 50-speed
film, and have their families appear superimposed over the 100-speed family
at the “ideal” location in the graph space. In fact, though, that rarely
happens because effective film speeds (EFS) for any given film/developer
combinations can be quite different from the manufacturer’s claimed ISO
values. This means that these films’ families will be displaced laterally
from the “ideal” graph location, and we can measure this displacement to
calculate their EFS values quite precisely.
To do this, remember
that the graph’s x-axis is calibrated in one-third-stop intervals that (conveniently!)
correspond to units in the common film speed sequence. For example, if we’re
testing an ISO 400-speed film and its family appears 2/3 stop to the right
of the “ideal” family location, we know that the real speed is 250, not
the 400 claimed.
Of course, to make this work we have to know where
that “ideal” family location is, and that requires careful calibration of
the film test exposure procedure.
To set up your test conditions
to establish this “ideal” curve location, set your enlarger lens aperture
at f/11 and adjust the enlarger height until you can read EV 4.0 on a white
card laid on the printing frame. If this setup produces an illumination
circle on the baseboard of less than about 15” in diameter, open the aperture
to f/8 and readjust the height. It’s important that the light circle be
large, and that the printing frame be placed in the center of it where the
illumination is most uniform. When you’ve completed these adjustments and
your spotmeter reads EV 4.0 on the white card, set your enlarger timer to
provide an exposure of 1/2 second. You’re now ready to begin calibration
for films of ISO 100 speed.
I recommend that you begin with Ilford
Delta 100, developed in either D-76, 1+1, or Xtol, 1+1, at 70°F., because
these combinations have been shown to produce an honest 100 speed. Expose
three sheets of film identically under a 21-step step tablet and process
the films together in the BTZS tubes for individual times of 4, 8, and 16
minutes. When the films are dry, read their densities into the Plotter and
select the Analysis tab. The Plotter’s gray “ISO triangle” will identify
the family’s “ISO” speed point and it will appear as a small gray circle
on the x-axis of the graph.
If the ISO mark falls on 2.4 on the
x-axis your test is complete and your test setup is calibrated to provide
useful film speed information. If the mark does not fall on 2.4, I recommend
that you adjust the enlarger height or the aperture, or both, to shift it
into place. Since each mark on the x-axis represents a 1/3-stop increment
of exposure, and since exposure increases from left to right, it’s easy
to estimate the necessary exposure correction. For example, if the “ISO”
mark falls on 2.2, the test was underexposed by 2/3 stop. Readjust the test
illumination until you read EV 4.67 (a 2/3-stop increase) and run another
3-sheet film test. This should place the “ISO” mark quite precisely on 2.4.
When that’s been accomplished, your test setup is calibrated. To test
other than 100-speed films you simply have to adjust the test exposure to
compensate for their different ISO ratings. For example, if EV 4.0 is appropriate
for 100-speed films, then use EV 2.0 for 400-speed films, EV 2.3 for TXT
(ISO 320), EV 3.67 for FP4 Plus (ISO 125), EV 3,0 for Bergger 200, etc.
If you make these exposure adjustments, and if the films are honestly rated
by their manufacturers, all of your film test families will be ideally located
with their ISO speed points on, or very close to 2.4.
But of course
this won’t happen very often, because many film/developer combinations don’t
provide the speed that their ISO ratings claim for them. And here’s where
a real problem can arise; the Plotter program has no way to know whether
a film is accurately rated or not, so it has to assume that the manufacturer’s
ISO value (which you enter in the Curve Family window in the Data tab) is
correct. All the program can do on its own is identify, in the curve family,
a curve that satisfies the ISO specifications — approximated by a curve
gradient of 0.62. Having found that curve mathematically (the curve may
not actually exist), the program marks its speed point in the x-axis and
labels it with the rated ISO speed. It then calibrates the EFS charts using
this ISO speed point as a reference.
More likely than not, that reference
speed point value is wrong; and if it is, the EFS chart data are wrong,
too. This is why it’s important to calibrate your test setup. You need to
provide the Plotter with an accurate point of reference to use in calculating
the real speed of the tested materials.
If you have calibrated your
test setup as I’ve recommended above, your Personal Reference Speed Point
is 2.4. This is not a magic number; if you prefer to use 2.3 or 2.5 — or
some other number — the Plotter will be able to work with it. But don’t
stray too far from 2.4 because higher numbers may lop off some of the curve
toe contours and lower numbers will limit the curve length the Plotter needs
to complete its analyses. I recommend 2.4 as a reasonable standard, and
that’s the value you should enable in the Options window if you plan to
use any of the test files that are supplied with the Plotter.
As
an illustration of how this personal reference speed point works, compare
figures 1 and 2. In figure 1 the reference speed point has been disabled
and the Plotter (in the absence of a reference) has assumed that this 100
speed film (Agfa APX 100 in D-76 1+1) is accurately rated. Notice that the
EFS values range from 40- to 160-. In figure 2 the reference point has been
enabled and its location is marked on the x-axis with a dark circle/triangle
combination very close to 2.4. In this case the Plotter has recognized the
ISO reference and has derated the film accordingly by about one stop. Now
you can see that the family’s EFS values range from 16+ to about 64+ — a
significant difference, and one that could cause you to underexpose if you
were working with the unadjusted Plotter data.
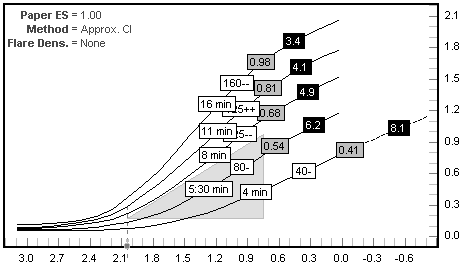
Figure 1, personal speed point reference disabled
|
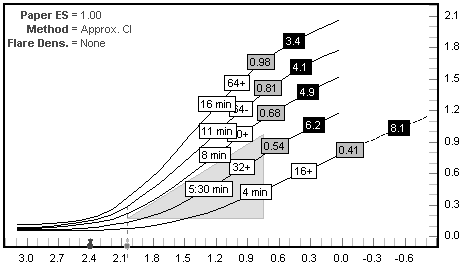
Figure 2, personal speed point reference enabled
|
|